
This is the sixth part of the eight-part series documented on the web app project I undertook – OSAAT. In the previous posts, I gave a brief introduction of the project, along with how we communicated, researched and kicked off the site development. The second part contained a thorough walkthrough of the development of the login page and its authentication. And in the third and fourth parts, I went through how I built all the Customer pages and Order Wizard. Finally, in the fifth part, those pages were smoothly integrated with the Calendar page.
In this post, we will explore the production workstation pages where the orders that were placed from the order wizard (covered in the fourth part) are released for manufacture, essentially allowing access to a special set of pages where workers are guided with something like a checklist on each stage of the order. The production workstation is considered to be separate from the main site, in terms of page orientation, design and access, where only workers and certain admins are allowed access. To give a high-level overview, the page has 8 buttons on its dashboard, representing 8 different stages, from box cut workstation (stage 1) to order shipping (stage 8).
First, I will start by showing you the designs that were provided to me, and then discuss the features. And finally, I will briefly go through each workstation page.
UI DESIGN MOCKUPS
The designs look different from the ones in the previous documentation. They are portrait, because of the large portrait touch screens, they are intended to be used on. The same reason why the checklist contains large buttons that change colour on touch.
PRODUCT TYPES
I covered this before in the order wizard documentation, but I thought it would be relevant if I went over it in this documentation too.
There are 10 product types; each product type has 3 parts.
- HD FRT BOX
- STD FRT BOX
- HD CGU BOX
- STD CGU BOX
- HD CGU EXP
- STD CGU EXP
- DLX CGU BOX
- DLX FRT BOX
- XL FRT BOX
- XL CGU BOX
The first part usually determines the size of the sunshade unit – STD (Standard), HD (Heavy Duty), DLX (Deluxe), XL (Extra Large). STD units have the smallest frames, HD units have bigger frames, and XL units have the biggest frames. HD products above a certain size automatically become DLX.
The second part states if the sunshade is an FRT (Fabric Retention Shade) or a CGU (Cable Guided Unit). The “Motor Type” options depend on whether the unit is an FRT or a CGU.
The third and last part of the product type string refers to the presence of a box. If the product is BOX, it contains a box; if it’s EXP, it’s exposed, meaning there isn’t a box. Depending on this, some fabric colours are available for the product and some aren’t.
WORKSTATIONS
Box Cut / Tube Cut / Pre-Assembly Workstations
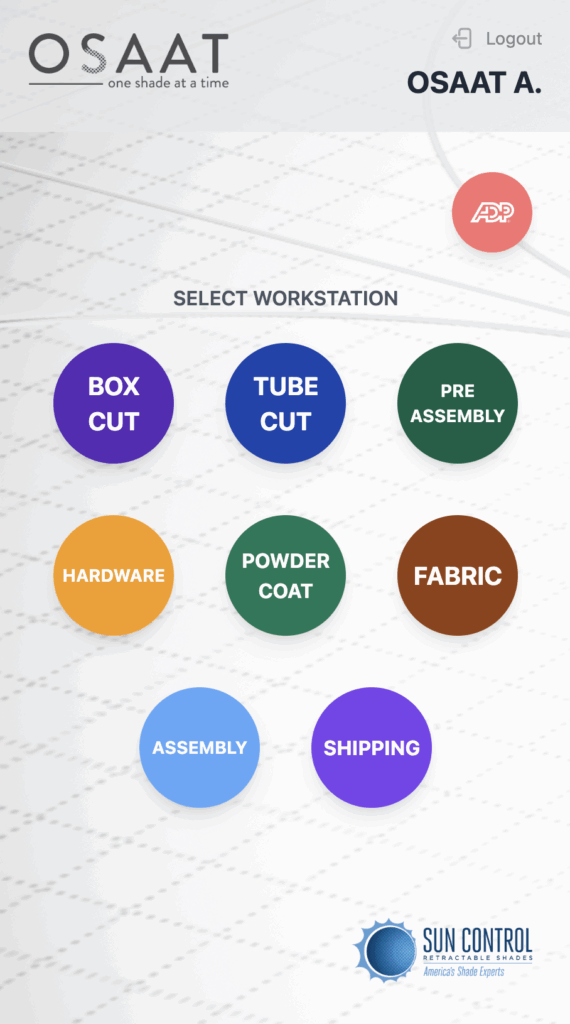
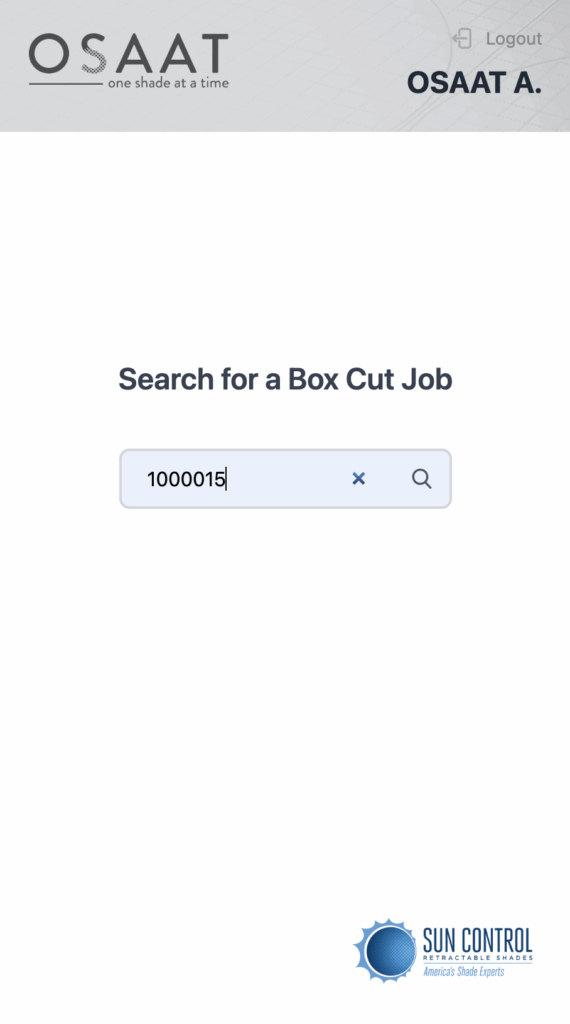
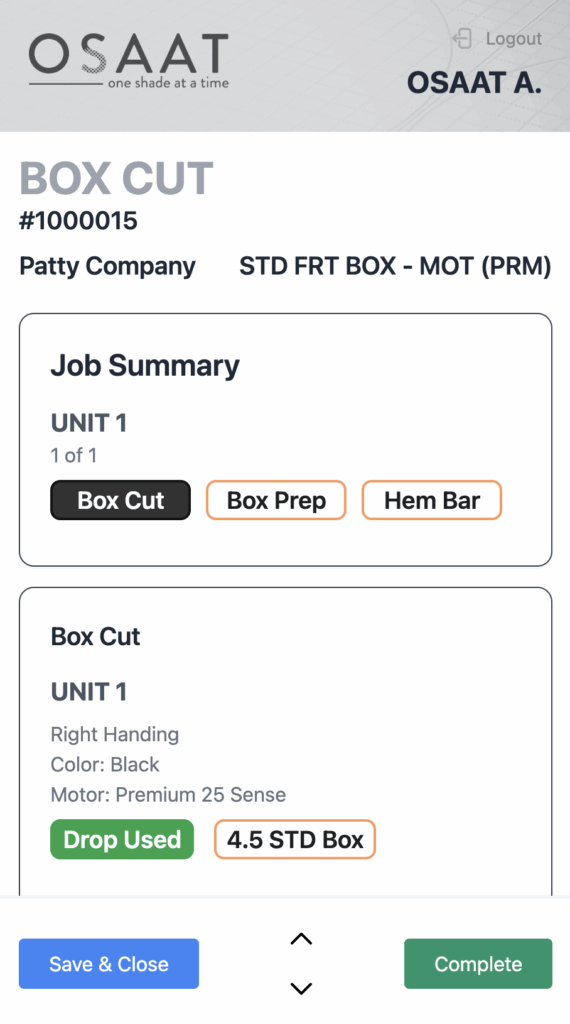
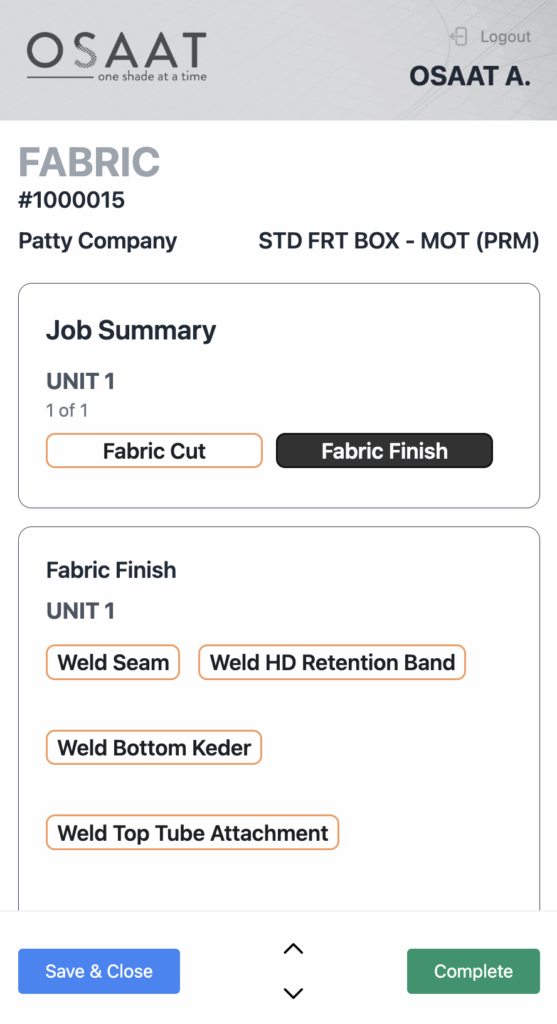
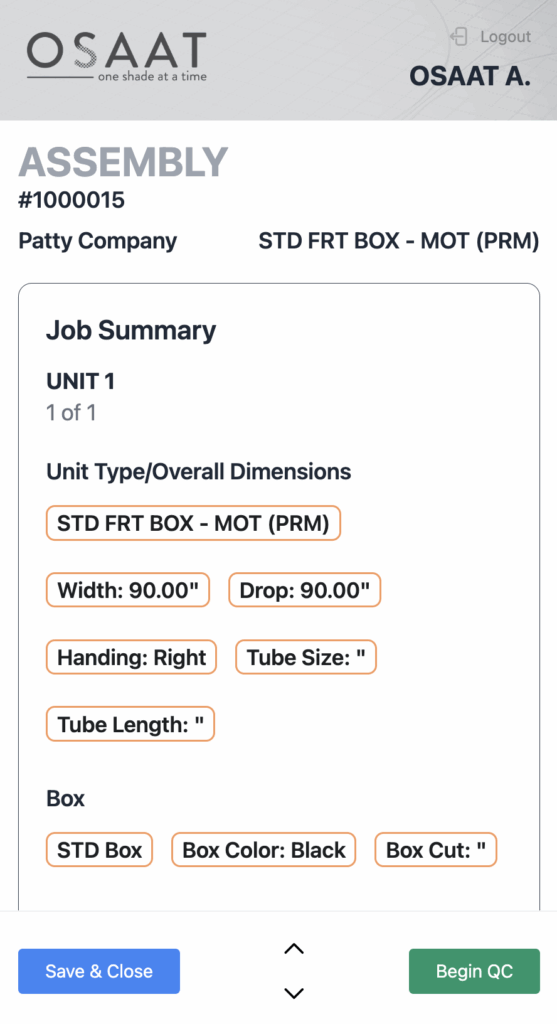
When a job is being released for production (covered in part 4 order wizard pages), it becomes available on the workstation pages, where entering the job number of the order will take you to the workstation page for the order. The buttons on the first div are tabs that can be toggled, where the current tab is black, and the rest are outlined in orange. Within each tab, there are a bunch of buttons that appear on the second div with all the details on it. These buttons can be toggled to green (completed), and back to orange-outline (yet to be completed) with just a click. When all the buttons within a tab are green, the tab turns green, indicating that the manufacturing steps have taken place.
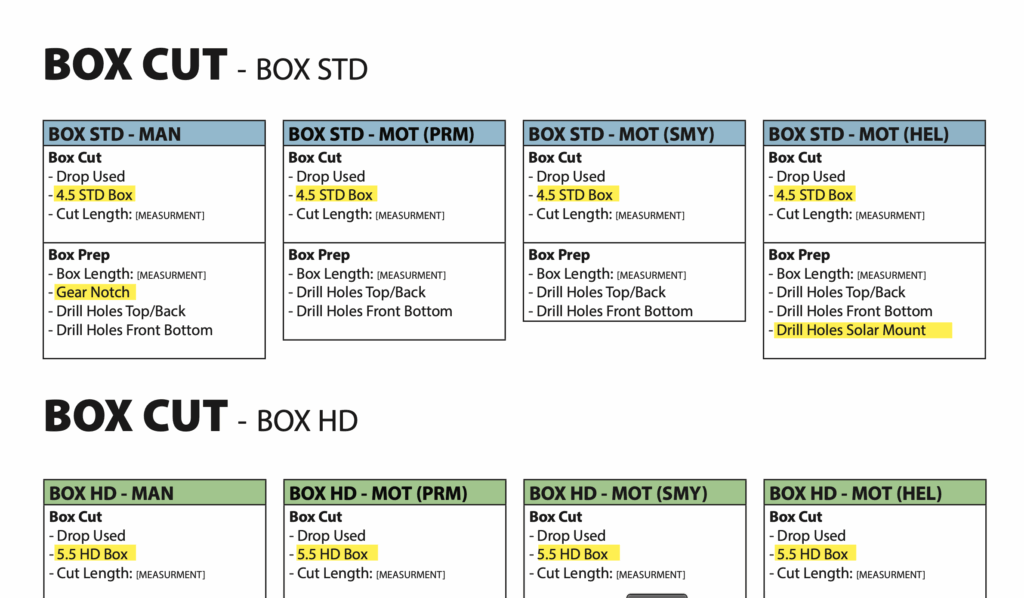
For box cut, the tabs will always be the same – box cut, box prep and hem bar. But the checklist buttons within depend on the type of unit. Since the unit in #1000015 is a STD FRT BOX, it requires a 4.5 STD BOX. If the product type were something like HD CGU EXP, where the unit uses an exposed frame (EXP), which means there are no boxes, the box cut workstation wouldn’t contain as many buttons as there are for STD FRT BOX. I was provided a PDF like the one above that contained all the details about what should appear on the box cut workstation, depending on the product type. The same applies to tube cut and pre-assembly workstations.
Hardware / Fabric / Assembly / Shipping Workstations
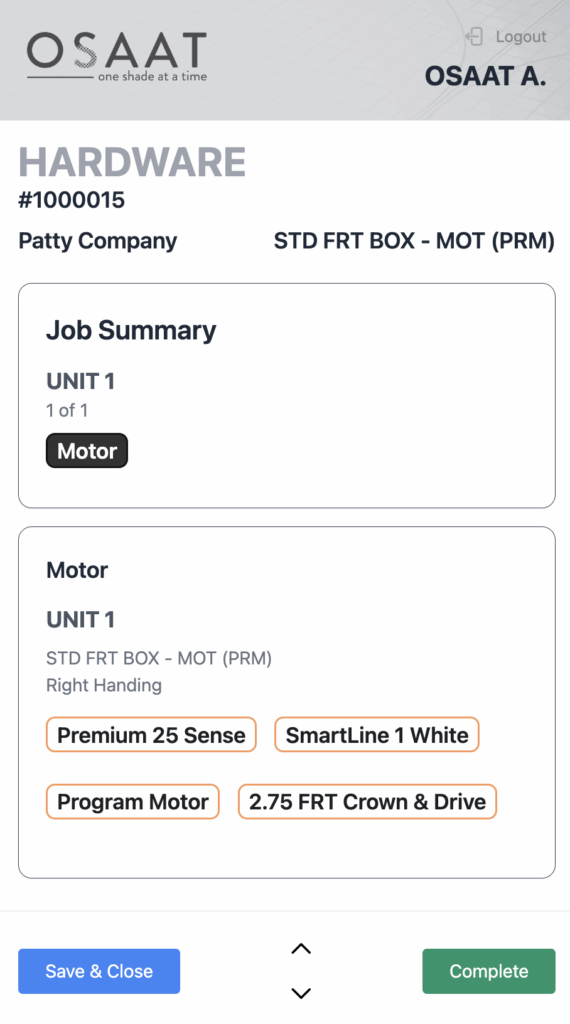
The hardware workstation depends mostly on the remote and accessories (or hand brace, depending on whether the unit was manual or motorised) that were selected during the order placement by the client. The available motor types depend on the product type selected, but they’re always a variation of these 3 types – Premium, Somfy, Helios (Solar powered). So, depending on the remote type, certain buttons appear. For instance, since Helios is solar-powered, if the unit used a helios-type motor, buttons like “Charge solar station” appear on the checklist.
In the case of a fabric workstation, there aren’t too many unit-dependent dynamic displays of checklist buttons, except for one button that directly mentions the colour of the fabric (fabric colour) that was selected during order entry.

As for the assembly workstation, it combines all the work from all the other workstations and requires QC confirmation from a QC manager, which requires an authorisation through a pop-up that contains 3 hardcoded QC seals, each representing a QC manager who is allowed to authorise QC, by entering their account password.
Finally, the shipping workstation is similar to hardware, except it contains details based on the “Ship via” field from the order wizard page.
Powder Coat Workstations
Powder Coat workstation was the most complicated workstation page. Since they have a lot going on inside the page, along with the fact that they are very different from other workstation pages, which required building the page, model and functions differently.
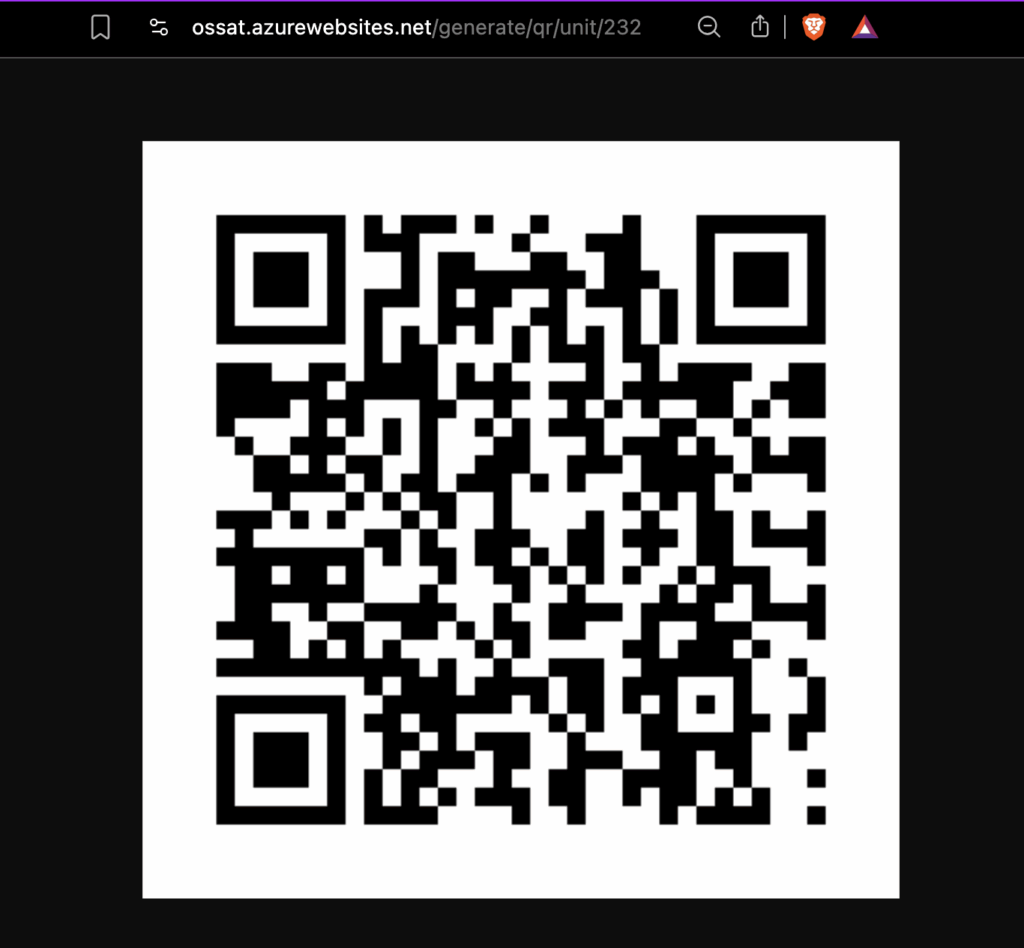
The site generates a unique QR code for each unit in a workstation job that has been released for production. These QR codes are then scanned by a worker to allow them to be released for powder coat. All units that are released for powder coat will be displayed in the powder coat workstation. These units will be displayed as buttons with the label showing the unit number and job number.
The text, border, and background colour of these buttons depend on the status of other units of the same job, or the presence of an L-channel (I will go into detail about what this is later). There is a button called “Complete All“, which will mark all the units in the powder coat workstation as complete. All completed units can be viewed inside the completed tab within the powder coat workstation page, where the units are sorted based on their completion date, and can be searched using their completion date or job number.
Clicking on a button opens a pop-up that shows all the info about the particular unit in the particular order.
NEXT STEPS
This post is the sixth part of the whole project documentation series. In the next article, I will go through the Visit Maps pages, where I used Google Maps API to build the page which allowed the company’s visit crews to dynamically navigate to customers’ locations for visits scheduled from the Calendar page. Feel free to use the links below to read about any part of the project you are interested in. I’ll see you on the next post!
- Meetings and Project Kickoff – https://stagmoney.com/meetings-and-project-kickoff-osaat-part-1/
- Deployment, Authentication and Dashboard – https://stagmoney.com/deployment-authentication-and-dashboard/
- Customer Page – https://stagmoney.com/customer-pages/
- Order Wizard – https://stagmoney.com/order-wizard/
- Calendar – https://stagmoney.com/calendar-pages/
- Workstation – Current Post
- Map Navigation – Upcoming
- Minor Features – Upcoming
